CREATING & CUSTOMIZING USER
Adding a User
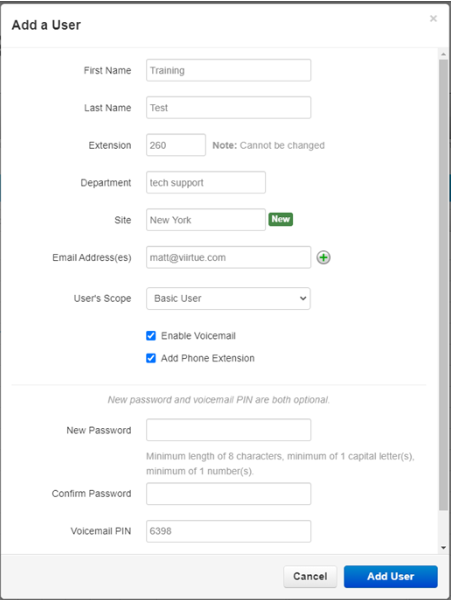
1. Click the users tab and select add user. The first and last name of a user will be
displayed for on-net calls.
2. Extension numbers cannot be changed. 2 - 5 digits extension are the standard for
our system.
3. The department and site fields are optional organizational tools. You can group users
by location or department for easy directory creation.
4. The email address will receive a copy of voicemail that are left on the users
extension. Multiple emails can be added by pressing the green plus sign.
5. Most users will be assigned the basic user scope but call centre agent, call centre
supervisor, and call centre manager are available options.
6. The new password field is optional. If your customers will not be using the Virtue
portal, then you do not need to set the password. If they change their mind, you can
send them a welcome email at any time.
7. The voicemail pin, normally 4 digits, is used to enter your voicemail account. It is also
used for as a fraud prevention tool when making an international call.
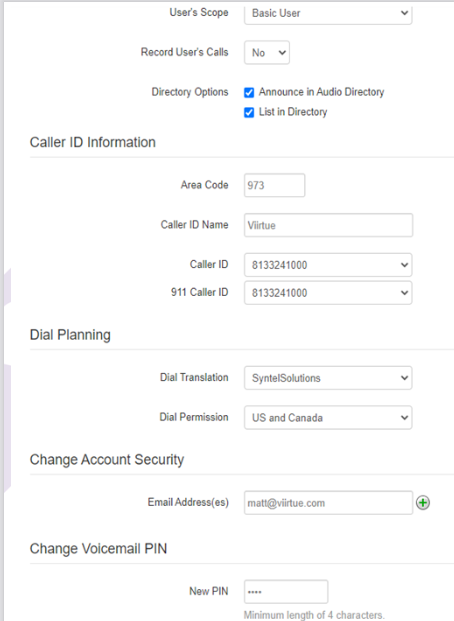
User Profile
Once you add the user, click on the user in the user’s name. This will
bring you to the profile page. There are a few extra settings you can
change in this tab.
1. Call recording can be enabled or disabled on this user.
2. The caller id and 911 caller drop downs allow you to change the numbers
associated with each.
3. The dial permission can be changed if this user needs international
calling. Set the user to limited international.
4. The user’s email can be changed, or new emails can be added.
5. The voicemail pin be updated also if necessary.
Answering Rules
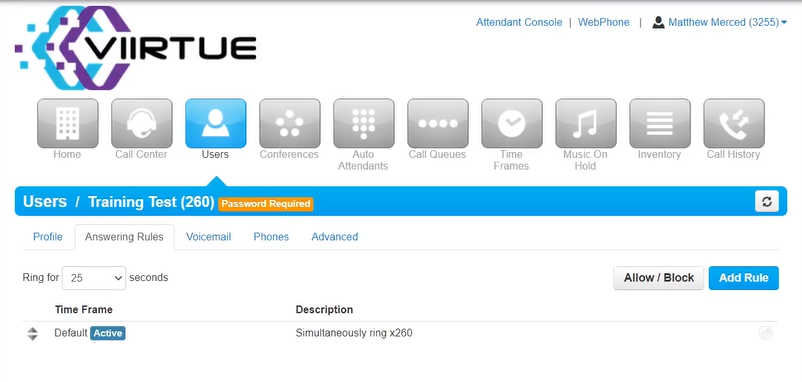
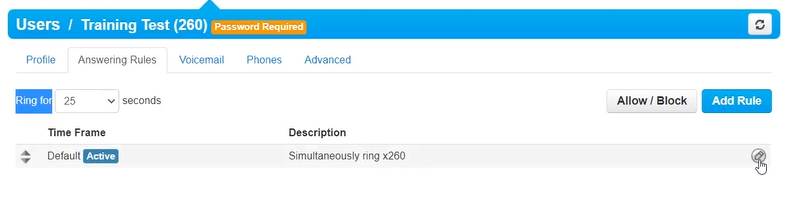
Next tap the answering Rule in the USERS tab, first we are looking for the Ring for timer by default 25sc.
Time Frame
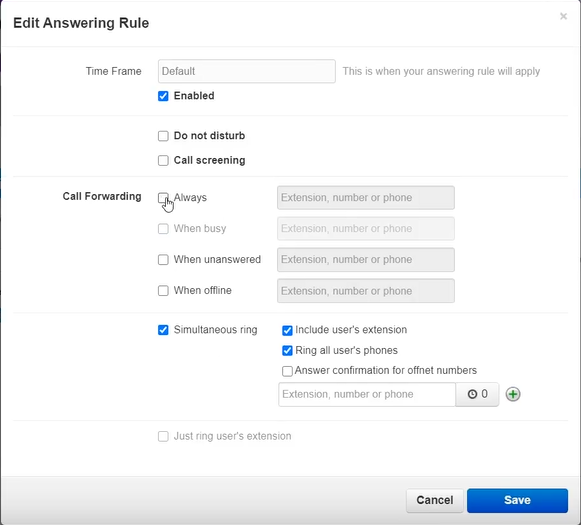
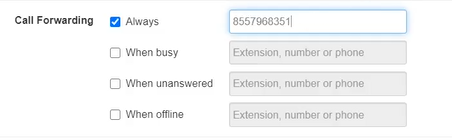
The time frame rule is 24x7 its working there, is another option on right side editing tool just click that. Then you can see the options there, call forwarding – then you click the Always
There you can check two different types of extension number or phone, look at the figure bellow
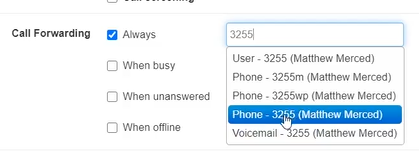 (Extension number)
 (Extension phone)
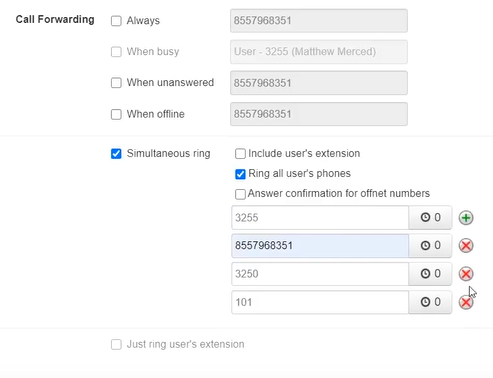
The call forwarding has sum more options when bust, when unanswered, when offline and simultaneous ring
WHEN BUSSY
When busy Is mean you receive a second call while on a call and the call is then transferred to the selected line.
WHEN UNANSWERED
When unanswered means that the phone rings to full 25sc whatever the call forward to the
WHEN OFFLINE
When offline means that the signal loss, internet connectivity issue, phone switch off etc... then set a number to forward.
SIMULTANEOUS RING
Simultaneous ring means that, there you can add multiple numbers there.

There you can also set a number that is not instantaneous, so the number may be delayed by 10 sc. There is an option on the right clock icon shown in the image above.

After you save the changes then you can see the description for e.g., shown in figure above.
You can also add separate time for him in the default. There is an option in the answering section. Click the Add Rule

Time frame there is an option and select the purpose, one’s time frame or vacation time frame etc...
Then the call forwarding option all are same as
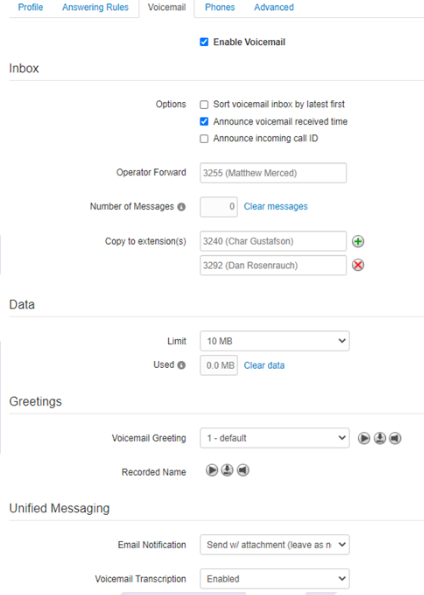
Voicemail Tab
The voicemail tab has several useful settings that some customers will require
.
1. The operator forward tab allows users callers to reach a different extension if they hit a
voicemail by pressing 0.
2. Clear messages will delete all messages in a mailbox. Do not use clear data. Clear data deleted
the greetings also.
3. Copy to extension will send a copy of each voicemail to the listed extensions.
4. Voicemail greeting and recorded name are recorded by default when a user presses the
voicemail button on their phone and enters a pin. The next slide will cover changing them
through the portal.
5. The popular email notification settings are:
None: no email, voicemail left on the phone
Send w/ attachment (leave as new): send email, voicemail left on the phone
Send w/attachment (move to trash: send email, no voicemail on the phone
1. Voicemail transcription allows speech to text in the voicemail emails.
Recording greetings in the portal
To record a greeting, start by clicking the manage button next to voicemail greeting.
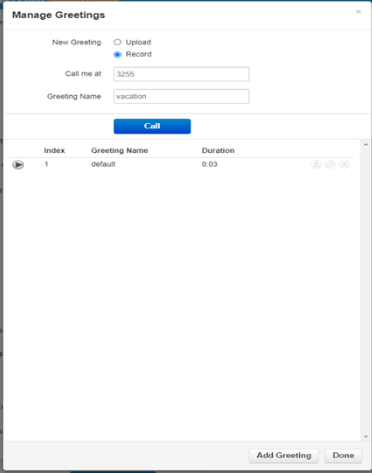
1. Press add greeting.
2. Select upload or record.
3. Give the greeting a name.
4. If you selected record:
Enter your extension or cell number in the call me at field.
Press call. After answering the call, the system will prompt the user to record the
greeting.
Hang up when finished
1. Repeat if necessary.
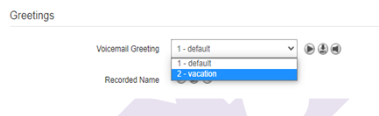
2. Once the recording is complete press down.
3. Activate the recording using the voicemail greeting drop do.